BIO270 Laboratory Guide #5
EXTERNAL ANATOMY; INTEGUMENT;
TAXIDERMY I: STUDY SKINS; SKINNING AND DEBRIDEMENT
After completing this laboratory you should be able to:
1) Identify external anatomical features in the shark, salamander, and cat;
2) Recognize skin cross-sections from each of the vertebrate classes in histological section;
3) For each vertebrate class, describe the origin, formation, and structure of characteristic integument features such as scales, hair, feathers, poison glands, and keratinization;
4) Appreciate how the skin attaches to the body in mammals via the hypodermis and superficial subcutaneous musculature;
You will also prepare a mammalian study skin or taxidermy mount.
I. EXTERNAL ANATOMY
1) Acquire and label the shark, mudpuppy, and cat specimens which you will be dissecting for the remainder of the semester.
2) Work through K&Z pages 87-89, 96, and 102, dealing with external anatomy of the dogfish shark, mudpuppy, and cat, using your preserved specimens. Be able to identify the underlined structures in the text and the labeled structures in the figures, as specified in the list below.
3) Review the meaning and use of anatomical terms for planes of section and relative location.
Structures to identify:
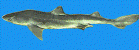
Shark:
head, trunk, tail
pectoral fins
pelvic fins
claspers (male)
dorsal fins
caudal fin
eyes
external nares
incurrent apertures
excurrent apertures
nasal sac
gill slits
spiracles
ampullae of Lorenzini
cloaca
urinary papilla
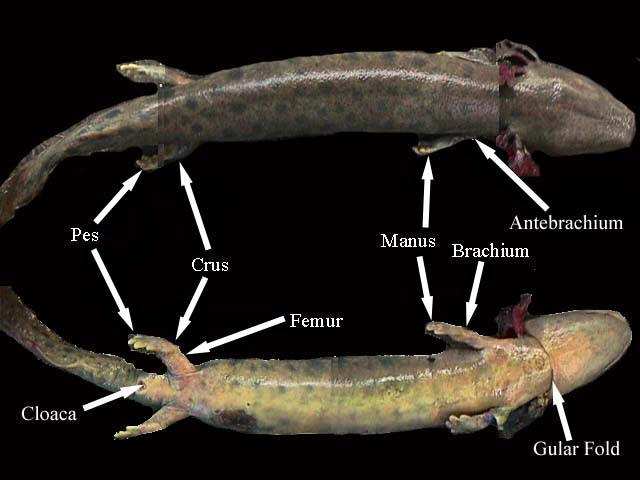
Necturus:
head, neck, trunk, tail
forelimbs
hindlimbs
eyes
external gills
gular fold
cloaca
cloacal gland (swelling)
Cat:
head, neck, trunk, tail
forelimbs
hindlimbs
tori (foot pads)
eyes
external nares (nostrils)
vibrissae
pinnae (external ears)
scrotum and penis (male)
urogenital cavity (female)
II. INTEGUMENT
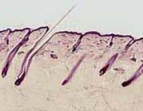
1. Work through the loan collection slides of vertebrate integuments. Use as a guide the index cards, figures in the Kardong text, and K&Z exercise #4, dealing with integuments. Be able to identify the source of each skin sample, the underlined structures on the cards, the bold print structures from the manual, and the structures in the manual figures. Don't worry about specific epidermal cell layers.
2. Closely examine the samples of turtle shells, nails, claws, hooves, scales, feathers, hair, antlers, and horns (if available), using K&Z exercise #4 as a guide. Be able to briefly describe the structure, tissue source, and development of each.
III. PREPARING A STUDY SKIN
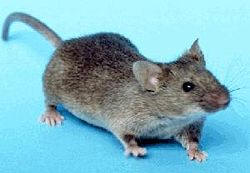
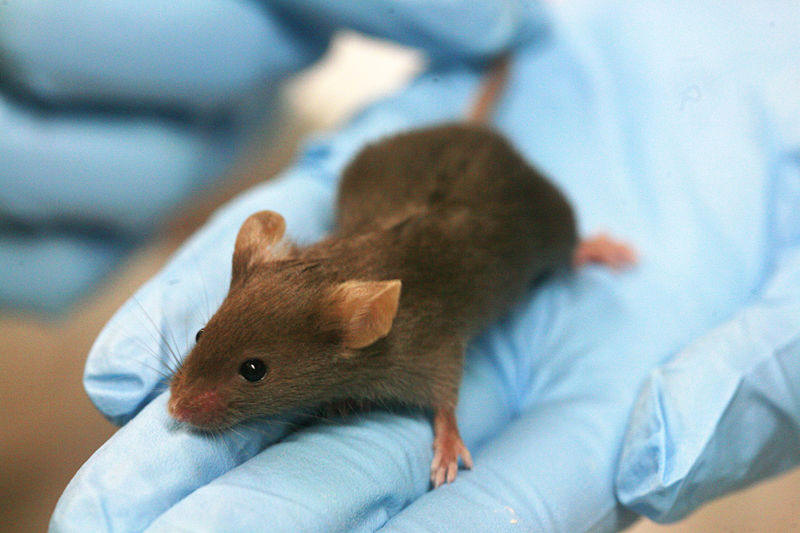
In this lab you will work in pairs to produce a museum mount of a mouse. You may prepare this as either a standard stuffed "study skin" or as a posed taxidermy mount.
1) Obtain the ex-mouse from the instructor.
2) Skin the mouse, using the following procedure. As you work, immediately clean any blood or bodily fluids off of the fur on the outside of the skin, by carefully rubbing it with DRY cornmeal. If absolutely necessary, you can gently wipe the fur with a damp cloth, but only if you immediately soak up any excess water with DRY cornmeal. Do not allow the skin to stay wet, as this will cause severe shrinkage as it later dries.
a) Using a pair of scissors make a ventral midline incision from the base of the chin to the base of the tail. Be careful to cut only through the skin, NOT through the body wall.
b) Make additional ventral incisions laterally from the midline to the elbow or ankle of each lateral appendage.
c) Carefully cut through the elbow and ankle joints, as well as the vertebral column at the base of the tail, making sure that you do not cut through the skin.
d) Using blunt dissection wherever possible, separate the skin from the underlying tissues of each appendage.
e) Working from the ventral incision around each side to the dorsal midline, free the skin from the trunk musculature. Use blunt dissection wherever possible, and turn the skin (pelt) inside-out as you go. When you complete this step the skin should be attached to the innards of the mouse only at the head.
f) This is the difficult part. Carefully work forward from the shoulders and neck to detach the skin from the head. The carefully cut through the base of each ear, so that the external ear (pinna) remains part of the pelt. Cut carefully around each eye socket to preserve the eyelid structure. At the end of the snout you will have to cut through the underlying bones so that the external nose remains part of the pelt. Be careful not to cut the whiskers.
g) In the region of the mouth you have the option of keeping the front incisors as part of the pelt, or detaching them.
h) When you have the entire pelt detached, carefully rub the inside with DRY borax, to remove the underlying fat. If you skip this step, the skin will rot, rather than drying correctly.
i) Finally, pack the entire detached pelt in DRY borax for at least 30 minutes. This will help preserve the skin.
3) When you are ready to complete your study skin or taxidermy mount, unpack the skin and BRUSH all of the borax off of both sides. It is important that you NOT GET THE SKIN OR THE BORAX WET AT ANY POINT IN THIS PROECESS.
4) If you wish to produce a simple study skin, simply turn the pelt right-side-out, stuff it with cotton, and sew it up. You nay choose to sew the mouth shut. Position the forelegs so that they extend to the front and the hindlegs and tail so that they extend behind the animal. Set the stuffed skin in a secure location and allow it to dry for at least 4 days.
5) If you wish to produce a taxidermy mount, follow the steps below.
a) Choose a realistic (or unrealistic) pose for your animal.
b) Use a single long piece of green florist's wire to construct a frame that approximates the pose for the trunk and upper part of each limb. Your frame should have a single wire that will extend at least one inch into tail and a doubled wire that extends one half inch into the head. Twisted wires work well as limbs.
c) Carefully shape a solid piece of foam into the shape and size of the head. Color two of the glass beads with fingernail polish. When the beads dry, position them as eyes in the foam form.
d) Turn the pelt right-side-out and stuff the head of the pelt with the foam model core, carefully positioning the eye beads.
e) Thread the tail wire down the spinal canal of the tail. Skewer the foam head core on the head wires. If the wire is too long, extract it and cut it to a better length. Position the remainder of the wire frame within the trunk and limbs.
f) Fill in the trunk and proximal limbs with cotton as you sew up the original incisions.
g) Carefully make any last adjustments to the body, head (especially ears), limb, and tail positions, then set the completed mount aside to dry for at least 4 days.
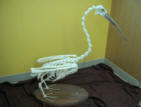
IV. PRELIMINARY RESEARCH FOR SKELETAL RECONSTRUCTION
Over the next two weeks you will work in a larger group to rearticulate the complete skeleton of a small mammal or bird (see the project description in the link at the left). To prepare for this, you will first need to determine a naturalistic pose for your skeleton. Your homework for this next week will be to go online and find as many photographs of your animal as possible. Choose your favorite poses, share these with your groupmates, then choose a final pose. Most skeletons will need to be supported by one or two metal props or struts under the spinal column or carina (for carinate birds). Try not to choose a pose which is non natural, terribly complex, structurally unstable/top-heavy, or requires more than two props.
Once you have settled on a final choice for a pose, discuss your choice with the instructor. Together with the instructor, you will need to determine the dimensions of the 3/4" wooden base for your skeleton, as well as the dimensions of any support props. These will be manufactured for you by the instructor.
As a final preparatory task you should come into the lab and look through the appropriate guidebook to skeletal reconstruction.